Inspection tin box & Metal Can procedure
Inspection method
1) make sure you have clear & flat surface
2) put the tin on clear & flat surface
3) test 4 corner make sure the tin was well assembled
4) check printing, scratch, embossing & etc. base on one arm distance
5) check inside base on one arm distance
6) finish checking
AQL standard (Acceptable Quality Level)
As MIL-STD-105E is based on random sampling, therefore a few defectives are considered acceptable. The AQL is the maximum defective rate that, for purposes of sampling inspection, can be considered satisfactory as a process average. Different AQLs may be designated for different defects such as critical, major and minor defects. The AQLs should be agreed upon between buyer and supplier before the start of production. The following AQLs are usually applied by QA China unless otherwise instructed by the client :

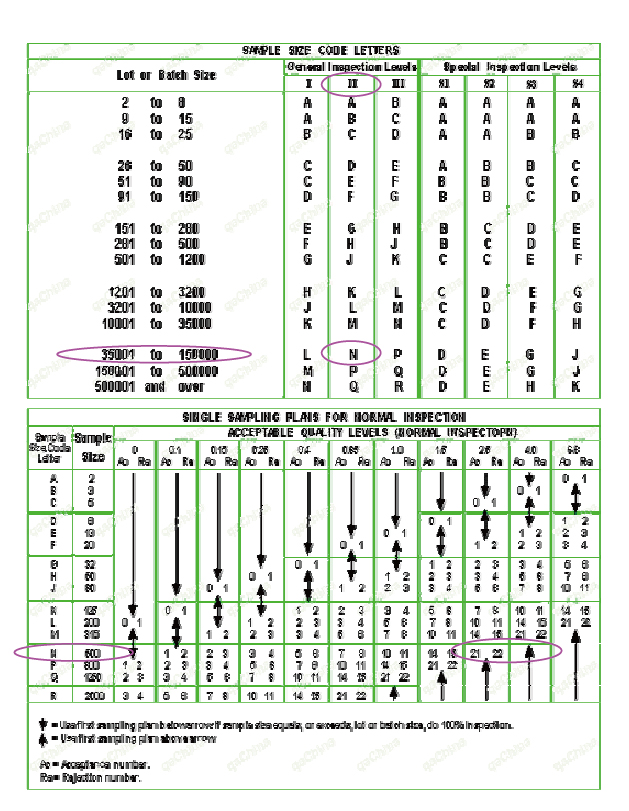
Neibor Tin Box standard based on AQL II C=0; M=2.5; m=4.0
For example (refer to following AQL table)
Lot or batch size = order quantity = 50,000pcs
General Inspector level = N
Then go to the next table “Acceptable quality levels (normal inspection)”
N = select 500pcs randomly, base on “inspection method” for checking
Critical (C) = 0pcs accept; 1pcs reject
Major (M) = 21pcs accept; 22pcs reject
Minor (m) = 21pcs accept; 22pcs reject
MIL-STD-105E


